##############################
# Cuidado con los espacios xd
##############################
#!/usr/bin/python
import cgi
def main():
print "Content-type: text/html\n"
print "<html><head><title>Formulario</title></head><body><p>\n"
entrada = cgi.FieldStorage()
if entrada.has_key("nombre") \
and entrada["nombre"].value != "":
print "Fail, %s.<br><a href="%s.html">" \
% entrada["nombre"].value
else:
print "Define por favor tu nombre \
para poder acceder el sistema.\n"
print "</p></body></html>"
main()
elrichicorex=open("%s.html", "w")
elrichicorex.write("<html>\n")
elrichicorex.write("H")
elrichicorex.write("</html>\n")
escribe.close()
martes, 21 de septiembre de 2010
martes, 14 de septiembre de 2010
Instalar Apache
Para poder hostear una pagina web es necesario tener el Apache Instalado
En Debian/Ubuntu tecleamos desde la terminal:
sudo apt-get install apache2
Para comprobar que se instalo correctamente el Apache abrimos el navegador y entramos a http://localhost/
Con el apache se van a crear unas librerias para el cgi-bin y para lo que es el HTML.
Para editar el HTML teclearemos:
ubuntu@ubuntu:~$ cd /var/www/
Guia de Instalación que hice para un maestro.
En Debian/Ubuntu tecleamos desde la terminal:
sudo apt-get install apache2
Para comprobar que se instalo correctamente el Apache abrimos el navegador y entramos a http://localhost/
Con el apache se van a crear unas librerias para el cgi-bin y para lo que es el HTML.
- cgi-bin en esta carpeta vamos a guardar los archivos en Python.
ubuntu@ubuntu:~$ cd /usr/lib/cgi-bin/
- www y aqui se van a guardar los archivos HTML.
ubuntu@ubuntu:~$ cd /var/www/
Para editar el HTML teclearemos:
ubuntu@ubuntu:~$ cd /var/www/
ubuntu@ubuntu:/var/www$ emacs NOMBRE.html &
Para editar el archivo .py:
ubuntu@ubuntu:~$ cd /usr/lib/cgi-bin
ubuntu@ubuntu:~$ cd /usr/lib/cgi-bin
ubuntu@ubuntu:/usr/lib/cgi-bin$ emacs NOMBRE.py &
Para hacer ejecutable el archivo .py
Guia de Instalación que hice para un maestro.
Conexión SSH
Esta entrada consta de una breve explicacion de como utilizar la terminal para acceder a otra computadora.
Bueno lo primero es abrir la Terminal y vamos a teclea lo siguiente:
Realmente podras utilizar la terminal para acceder y editar los archivos a los que tengas los permisos.
Los siguientes ejemplos son los que utilizamos en Programacion web. Para utilizar la terminal como un control remoto a una computadora que funciona como servidor.
Ejemplos de directorios.
Editar permisos de los archivos.
Tomamos de ejemplo el archivo.py y para que sea ejecutable es nesesario teclear:
Llamar un CGI desde un HTML.
Es nesesario Añadir al archivo HTML la siguiente linea para que se conecte con el programa de Python
<form name="acceso" action="http://localhost/cgi-bin/NOMBRE.py" method="get">
Formulario.
</form>
La idea de esta entrada es para manejar paginas web, pero es muy util si aun estas aprendiendo comandos basicos para usar la Terminal.
Saludos :]
Bueno lo primero es abrir la Terminal y vamos a teclea lo siguiente:
ubuntu@ubuntu:~$ ssh Usuario@148.xxx.xxx.xx
donde ssh nos sirver para poder conectarnos al servidor.
al teclear lo primero nos perdira un password para conectarnos por razones de seguridad no se va a ver lo que estas tecleando.
Usuario@148.xxx.xx.xx's password:
Si te aparece esto quiere decir que estas conectado sin ningun problema.
Linux ubuntu 2.6.32-21-generic #32-Ubuntu SMP Fri Apr 16 08:10:02 UTC 2010 i686 GNU/Linux
Ubuntu 10.04 LTS
Welcome to Ubuntu!
* Documentation: https://help.ubuntu.com/
Ubuntu 10.04 LTS
Welcome to Ubuntu!
* Documentation: https://help.ubuntu.com/
Realmente podras utilizar la terminal para acceder y editar los archivos a los que tengas los permisos.
Los siguientes ejemplos son los que utilizamos en Programacion web. Para utilizar la terminal como un control remoto a una computadora que funciona como servidor.
Ejemplos de directorios.
Para acceder al directerio cgi-bin tecleamos:
usuario@ubuntu:~$ cd /usr/lib/cgi-bin/
Para poder ver los HTMLs en la carpeta:
ubuntu@ubuntu:~$ cd /var/www/
Si no conoces donde esta la ubicacion de la carpeta puedes teclear en la terminal ls y asi podras ver que archivos tiene la carpeta en la que estas.
Subir o descargar archivos.
PRIMERO NESESITAMOS ABRIR OTRA TERMINAL.
Tomaremos de ejemplo unos archivos en Python que utilizo se CGI.
Tomaremos de ejemplo unos archivos en Python que utilizo se CGI.
para poder descagar un archivo tenemos que teclear esto:
ubuntu@ubuntu:~/Desktop$ scp usuario@148.xxx.xx.xx:/usr/lib/cgi-bin/Nombre.py
y para subirlo
ubuntu@ubuntu:~/Desktop$ scp Nombre.py usuario@148.xxx.xx.xx:/usr/lib/cgi-bin/
Editar permisos de los archivos.
Tomamos de ejemplo el archivo.py y para que sea ejecutable es nesesario teclear:
usuario@ubuntu:/usr/lib/cgi-bin$ chmod a+x nombre.py
Para saber si se cambiaron los permisos es bueno usar ls o ls -la ya que segun el color te muestra los permisos que tiene y si agregas -la es dice que permisos tiene cada archivo.
Para saber si se cambiaron los permisos es bueno usar ls o ls -la ya que segun el color te muestra los permisos que tiene y si agregas -la es dice que permisos tiene cada archivo.
Llamar un CGI desde un HTML.
Es nesesario Añadir al archivo HTML la siguiente linea para que se conecte con el programa de Python
<form name="acceso" action="http://localhost/cgi-bin/NOMBRE.py" method="get">
Formulario.
</form>
La idea de esta entrada es para manejar paginas web, pero es muy util si aun estas aprendiendo comandos basicos para usar la Terminal.
Saludos :]
jueves, 9 de septiembre de 2010
Varios Comandos en HTML
Bien.. hace un año consegui esta lista en una pagina de internet, buscando tutoriales, no recuerdo cual fue... pero los guarde porque me paresieron utiles.
HTML Tags Chart
To use any of the following HTML tags, simply select
the HTML code you'd like and copy and paste it into your web page.
Espero que les sea de ayuda.
HTML Tags Chart
To use any of the following HTML tags, simply select
the HTML code you'd like and copy and paste it into your web page.
Tag
|
Name
|
Code Example
|
Browser View
| ||||||||||||
| <!-- | comment | <!--This can be viewed in the HTML part of a document--> | Nothing will show (Tip) | ||||||||||||
| <a - | anchor | <a href="http://www.domain.com/"> Visit Our Site</a> | Visit Our Site (Tip) | ||||||||||||
| <b> | bold | <b>Example</b> | Example | ||||||||||||
| <big> | big (text) | <big>Example</big> | Example (Tip) | ||||||||||||
| <body> | body of HTML document | <body>The content of your HTML page</body> | Contents of your web page (Tip) | ||||||||||||
| <br> | line break | The contents of your page<br>The contents of your page | The contents of your web page The contents of your web page | ||||||||||||
| <center> | center | <center>This will center your contents</center> |
This will center your contents
| ||||||||||||
| <dd> | definition description | <dl> <dt>Definition Term</dt> <dd>Definition of the term</dd> <dt>Definition Term</dt> <dd>Definition of the term</dd> </dl> |
| ||||||||||||
| <dl> | definition list | <dl> <dt>Definition Term</dt> <dd>Definition of the term</dd> <dt>Definition Term</dt> <dd>Definition of the term</dd> </dl> |
| ||||||||||||
| <dt> | definition term | <dl> <dt>Definition Term</dt> <dd>Definition of the term</dd> <dt>Definition Term</dt> <dd>Definition of the term</dd> </dl> |
| ||||||||||||
| <em> | emphasis | This is an <em>Example</em> of using the emphasis tag | This is an Example of using the emphasis tag | ||||||||||||
| <embed> | embed object | <embed src="yourfile.mid" width="100%" height="60" align="center"> | (Tip) | ||||||||||||
| <embed> | embed object | <embed src="yourfile.mid" autostart="true" hidden="false" loop="false"> <noembed><bgsound src="yourfile.mid" loop="1"></noembed> | Music will begin playing when your page is loaded and will only play one time. A control panel will be displayed to enable your visitors to stop the music. | ||||||||||||
| <font> | font | <font face="Times New Roman">Example</font> | Example (Tip) | ||||||||||||
| <font> | font | <font face="Times New Roman" size="4">Example</font> | Example (Tip) | ||||||||||||
| <font> | font | <font face="Times New Roman" size="+3" color="#ff0000">Example</font> | Example (Tip) | ||||||||||||
| <form> | form | <form action="mailto:you@yourdomain.com"> Name: <input name="Name" value="" size="10"><br> Email: <input name="Email" value="" size="10"><br> <center><input type="submit"></center> </form> | |||||||||||||
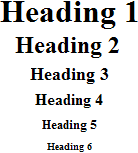
| <h1> <h2> <h3> <h4> <h5> <h6> | heading 1 heading 2 heading 3 heading 4 heading 5 heading 6 | <h1>Heading 1 Example</h1> <h2>Heading 2 Example</h2> <h3>Heading 3 Example</h3> <h4>Heading 4 Example</h4> <h5>Heading 5 Example</h5> <h6>Heading 6 Example</h6> | |||||||||||||
| <head> | heading of HTML document | <head>Contains elements describing the document</head> | Nothing will show | ||||||||||||
| <hr> | horizontal rule | <hr /> | Contents of your web page (Tip) Contents of your web page | ||||||||||||
| <hr> | horizontal rule | <hr width="50%" size="3" /> | Contents of your web page Contents of your web page | ||||||||||||
| <hr> | horizontal rule | <hr width="50%" size="3" noshade /> | Contents of your web page Contents of your web page | ||||||||||||
| <hr> (Internet Explorer) | horizontal rule | <hr width="75%" color="#ff0000" size="4" /> | Contents of your web page Contents of your web page | ||||||||||||
| <hr> (Internet Explorer) | horizontal rule | <hr width="25%" color="#6699ff" size="6" /> | Contents of your web page Contents of your web page | ||||||||||||
| <html> | hypertext markup language | <html> <head> <meta> <title>Title of your web page</title> </head> <body>HTML web page contents </body> </html> | Contents of your web page | ||||||||||||
| <i> | italic | <i>Example</i> | Example | ||||||||||||
| <img> | image | <img src="Earth.gif" width="41" height="41" border="0" alt="text describing the image" /> | (Tip) | ||||||||||||
| <input> | input field | Example 1: <form method=post action="/cgi-bin/example.cgi"> <input type="text" size="10" maxlength="30"> <input type="Submit" value="Submit"> </form> | |||||||||||||
| <input> (Internet Explorer) | input field | Example 2: <form method=post action="/cgi-bin/example.cgi"> <input type="text" style="color: #ffffff; font-family: Verdana; font-weight: bold; font-size: 12px; background-color: #72a4d2;" size="10" maxlength="30"> <input type="Submit" value="Submit"> </form> | |||||||||||||
| <input> | input field | Example 3: <form method=post action="/cgi-bin/example.cgi"> <table border="0" cellspacing="0" cellpadding="2"><tr><td bgcolor="#8463ff"><input type="text" size="10" maxlength="30"></td><td bgcolor="#8463ff" valign="Middle"> <input type="image" name="submit" src="yourimage.gif"></td></tr> </table> </form> | |||||||||||||
| <input> | input field | Example 4: <form method=post action="/cgi-bin/example.cgi"> Enter Your Comments:<br> <textarea wrap="virtual" name="Comments" rows=3 cols=20 maxlength=100></textarea><br> <input type="Submit" value="Submit"> <input type="Reset" value="Clear"> </form> | |||||||||||||
| <input> | input field | Example 5: <form method=post action="/cgi-bin/example.cgi"> <center> Select an option: <select> <option >option 1</option> <option selected>option 2</option> <option>option 3</option> <option>option 4</option> <option>option 5</option> <option>option 6</option> </select><br> <input type="Submit" value="Submit"></center> </form> | |||||||||||||
| <input> | input field | Example 6: <form method=post action="/cgi-bin/example.cgi"> Select an option:<br> <input type="radio" name="option"> Option 1 <input type="radio" name="option" checked> Option 2 <input type="radio" name="option"> Option 3 <br> <br> Select an option:<br> <input type="checkbox" name="selection"> Selection 1 <input type="checkbox" name="selection" checked> Selection 2 <input type="checkbox" name="selection"> Selection 3 <input type="Submit" value="Submit"> </form> | |||||||||||||
| <li> | list item | Example 1: <menu> <li type="disc">List item 1</li> <li type="circle">List item 2</li> <li type="square">List item 3</li> </MENU> Example 2: <ol type="i"> <li>List item 1</li> <li>List item 2</li> <li>List item 3</li> <li>List item 4</li> </ol> | Example 1: (Tip)
Example 2:
| ||||||||||||
| <link> | link | <head> <link rel="stylesheet" type="text/css" href="style.css" /> </head> | |||||||||||||
| <marquee> (Internet Explorer) | scrolling text | <marquee bgcolor="#cccccc" loop="-1" scrollamount="2" width="100%">Example Marquee</marquee> | (Tip) | ||||||||||||
| <menu> | menu | <menu> <li type="disc">List item 1</li> <li type="circle">List item 2</li> <li type="square">List item 3</li> </menu> |
| ||||||||||||
| <meta> | meta | <meta name="Description" content="Description of your site"> <meta name="keywords" content="keywords describing your site"> | Nothing will show (Tip) | ||||||||||||
| <meta> | meta | <meta HTTP-EQUIV="Refresh" CONTENT="4;URL=http://www.yourdomain.com/"> | Nothing will show (Tip) | ||||||||||||
| <meta> | meta | <meta http-equiv="Pragma" content="no-cache"> | Nothing will show (Tip) | ||||||||||||
| <meta> | meta | <meta name="rating" content="General"> | Nothing will show (Tip) | ||||||||||||
| <meta> | meta | <meta name="robots" content="all"> | Nothing will show (Tip) | ||||||||||||
| <meta> | meta | <meta name="robots" content="noindex,follow"> | Nothing will show (Tip) | ||||||||||||
| <ol> | ordered list | Numbered <ol> <li>List item 1</li> <li>List item 2</li> <li>List item 3</li> <li>List item 4</li> </ol> Numbered Special Start <ol start="5"> <li>List item 1</li> <li>List item 2</li> <li>List item 3</li> <li>List item 4</li> </ol> Lowercase Letters <ol type="a"> <li>List item 1</li> <li>List item 2</li> <li>List item 3</li> <li>List item 4</li> </ol> Capital Letters <ol type="A"> <li>List item 1</li> <li>List item 2</li> <li>List item 3</li> <li>List item 4</li> </ol> Capital Letters Special Start <ol type="A" start="3"> <li>List item 1</li> <li>List item 2</li> <li>List item 3</li> <li>List item 4</li> </ol> Lowercase Roman Numerals <ol type="i"> <li>List item 1</li> <li>List item 2</li> <li>List item 3</li> <li>List item 4</li> </ol> Capital Roman Numerals <ol type="I"> <li>List item 1</li> <li>List item 2</li> <li>List item 3</li> <li>List item 4</li> </ol> Capital Roman Numerals Special Start <ol type="I" start="7"> <li>List item 1</li> <li>List item 2</li> <li>List item 3</li> <li>List item 4</li> </ol> | Numbered
| ||||||||||||
| <option> | listbox option | <form method=post action="/cgi-bin/example.cgi"> <center> Select an option: <select> <option>option 1</option> <option selected>option 2</option> <option>option 3</option> <option>option 4</option> <option>option 5</option> <option>option 6</option> </select><br> </center> </form> | |||||||||||||
| <p> | paragraph | This is an example displaying the use of the paragraph tag. <p> This will create a line break and a space between lines. Attributes: Example 1:<br> <br> <p align="left"> This is an example<br> displaying the use<br> of the paragraph tag.<br> <br> Example 2:<br> <br> <p align="right"> This is an example<br> displaying the use<br> of the paragraph tag.<br> <br> Example 3:<br> <br> <p align="center"> This is an example<br> displaying the use<br> of the paragraph tag. |
This is an example displaying the use of the paragraph tag.
This will create a line break and a space between lines. Attributes: Example 1: This is an example displaying the use of the paragraph tag.
Example 2:
This is an example displaying the use of the paragraph tag.
Example 3:
This is an example displaying the use of the paragraph tag. | ||||||||||||
| <small> | small (text) | <small>Example</small> | Example (Tip) | ||||||||||||
| <strike> | deleted text | <strike>Example</strike> | |||||||||||||
| <strong> | strong emphasis | <strong>Example</strong> | Example | ||||||||||||
| <table> | table | Example 1: <table border="4" cellpadding="2" cellspacing="2" width="100%"> <tr> <td>Column 1</td> <td>Column 2</td> </tr> </table> Example 2: (Internet Explorer) <table border="2" bordercolor="#336699" cellpadding="2" cellspacing="2" width="100%"> <tr> <td>Column 1</td> <td>Column 2</td> </tr> </table> Example 3: <table cellpadding="2" cellspacing="2" width="100%"> <tr> <td bgcolor="#cccccc">Column 1</td> <td bgcolor="#cccccc">Column 2</td> </tr> <tr> <td>Row 2</td> <td>Row 2</td> </tr> </table> | Example 1: (Tip)
Example 2: (Tip)
Example 3: (Tip)
| ||||||||||||
| <td> | table data | <table border="2" cellpadding="2" cellspacing="2" width="100%"> <tr> <td>Column 1</td> <td>Column 2</td> </tr> </table> |
| ||||||||||||
| <th> | table header | <div align="center"> <table> <tr> <th>Column 1</th> <th>Column 2</th> <th>Column 3</th> </tr> <tr> <td>Row 2</td> <td>Row 2</td> <td>Row 2</td> </tr> <tr> <td>Row 3</td> <td>Row 3</td> <td>Row 3</td> </tr> <tr> <td>Row 4</td> <td>Row 4</td> <td>Row 4</td> </tr> </table> </div> |
| ||||||||||||
| <title> | document title | <title>Title of your HTML page</title> | Title of your web page will be viewable in the title bar. (Tip) | ||||||||||||
| <tr> | table row | <table border="2" cellpadding="2" cellspacing="2" width="100%"> <tr> <td>Column 1</td> <td>Column 2</td> </tr> </table> |
| ||||||||||||
| <tt> | teletype | <tt>Example</tt> | Example | ||||||||||||
| <u> | underline | <u>Example</u> | Example | ||||||||||||
| <ul> | unordered list | Example 1:<br> <br> <ul> <li>List item 1</li> <li>List item 2</li> </ul> <br> Example 2:<br> <ul type="disc"> <li>List item 1</li> <li>List item 2</li> <ul type="circle"> <li>List item 3</li> <li>List item 4</li> </ul> </ul> | Example 1:
Example 2:
|
Espero que les sea de ayuda.
Suscribirse a:
Entradas (Atom)